
Introduction
On the latest operating systems for Mac and iPad (such as macOS Sequoia 15 / iPadOS 14 or later), a feature that automatically creates and changes a temporary MAC address (Private Wi-Fi Address) is enabled by default for security protection.
Due to this feature, even for devices that have already completed the user registration for the “MUSIC Network,” the automatic changes to the MAC address are causing technical issues where devices suddenly lose their internet connection.
If you experience issues such as “Suddenly unable to connect to the campus wireless LAN (MUSIC Network) despite having completed registration” or “The connection drops frequently,” please follow the steps below to set the Private Wi-Fi Address to “Off.”

MacBook (PC) Setup Steps
- 11.Open System Settings
001システム設定-1024x609.jpg)
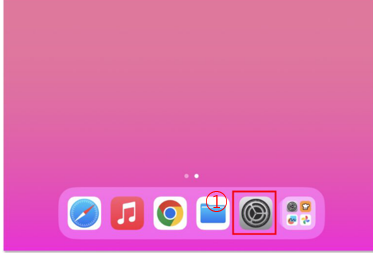
Click the 🍎 Apple menu in the top-left corner of the screen (①), and select “System Settings” (②).
- 2Open Wi-Fi Advanced Settings
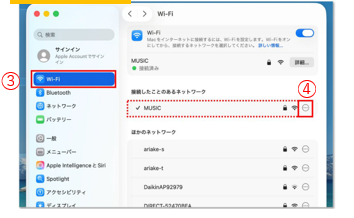
Select “Wi-Fi” from the left sidebar (③).
From the network list on the right, click the “Details…” button (④) located to the right of “MUSIC.”
- 3Turn the Setting “Off”
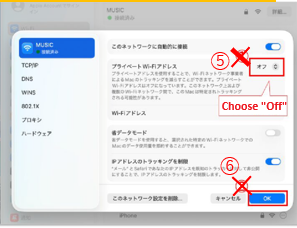
Select “Off” (⑤) from the “Private Wi-Fi Address” drop-down menu, and click “OK” (⑥).
Note on Private Address Settings: The available options are “Off,” “Fixed,” and “Rotating.” Since “Fixed” and “Rotating” overwrite your actual MAC address, you will not be able to connect even if you attempt to join the MUSIC Network. Please make sure to set it to “Off.”
- Approving the Warning Message:

A confirmation message asking “Turn Off Private Wi-Fi Address?” will be displayed. Please click “Turn Off” (⑦). (Note: A privacy-related warning will appear. However, this setting change is necessary to use the campus Wi-Fi securely, so it is safe to proceed.)
- 4Final Confirmation
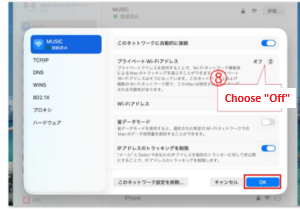
Confirm that the Private Wi-Fi Address has changed to “Off,” and click “OK” (⑧) in the bottom right to close the window.
The Private Wi-Fi Address is now disabled. Please connect to the MUSIC Network and verify that the internet is working properly.
iPad (Tablet) Setup Steps
- 1Open the Settings App
Select “Wi-Fi” from the left sidebar (②).
From the network list on the right, click the “Details…” button (or the ⓘ icon) (③) located to the right of “MUSIC.”
- 2Open Private Wi-Fi Address Settings
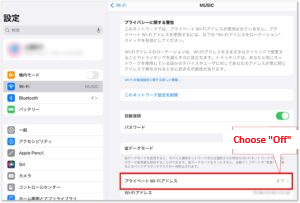
002MUSIC詳細-1024x593.jpg)
In the sidebar, select “Wi-Fi”, and then tap the “Details” (or “i” icon) rightside to “MUSIC”.
- 3Open Wi-Fi Advanced Settings
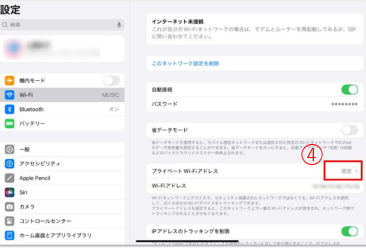
Tap the “Private Wi-Fi Address” item (list option) (④).
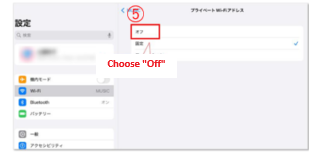
Tap “Off” (⑤) from the list.
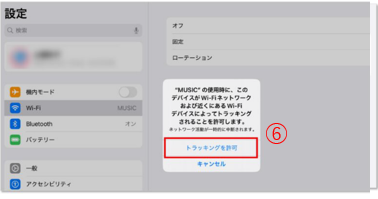
If a confirmation message regarding tracking appears on the screen, tap “Allow Tracking” (⑥).
- 4Final Confirmation
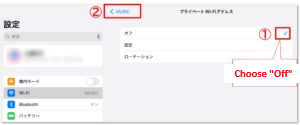
Confirm that “Off” is checked (①), and tap “< MUSIC.”
Verify that the Private Wi-Fi Address is explicitly shown as “Off.”
The Private Wi-Fi address is now turned off.
Please connect to the MUSIC network and check if you can use the internet.